


Disclaimer: This post may contain Amazon affiliate links. Sudachi earns a small percentage from qualifying purchases at no extra cost to you. See disclaimer for more info.
Featured Comment
This is a delicious cake! I won 3rd place in a bake-off at work with this recipe.
★★★★★
– Clark
Looking for a Castella recipe that tastes and feels just like the ones you can buy in speciality stores in Japan? Getting the right texture is especially important with this cake, and with my technique you can achieve that without using complicated ingredients.
If you want to try a perfectly sweet, moist and fluffy Castella cake, this is the recipe for you!

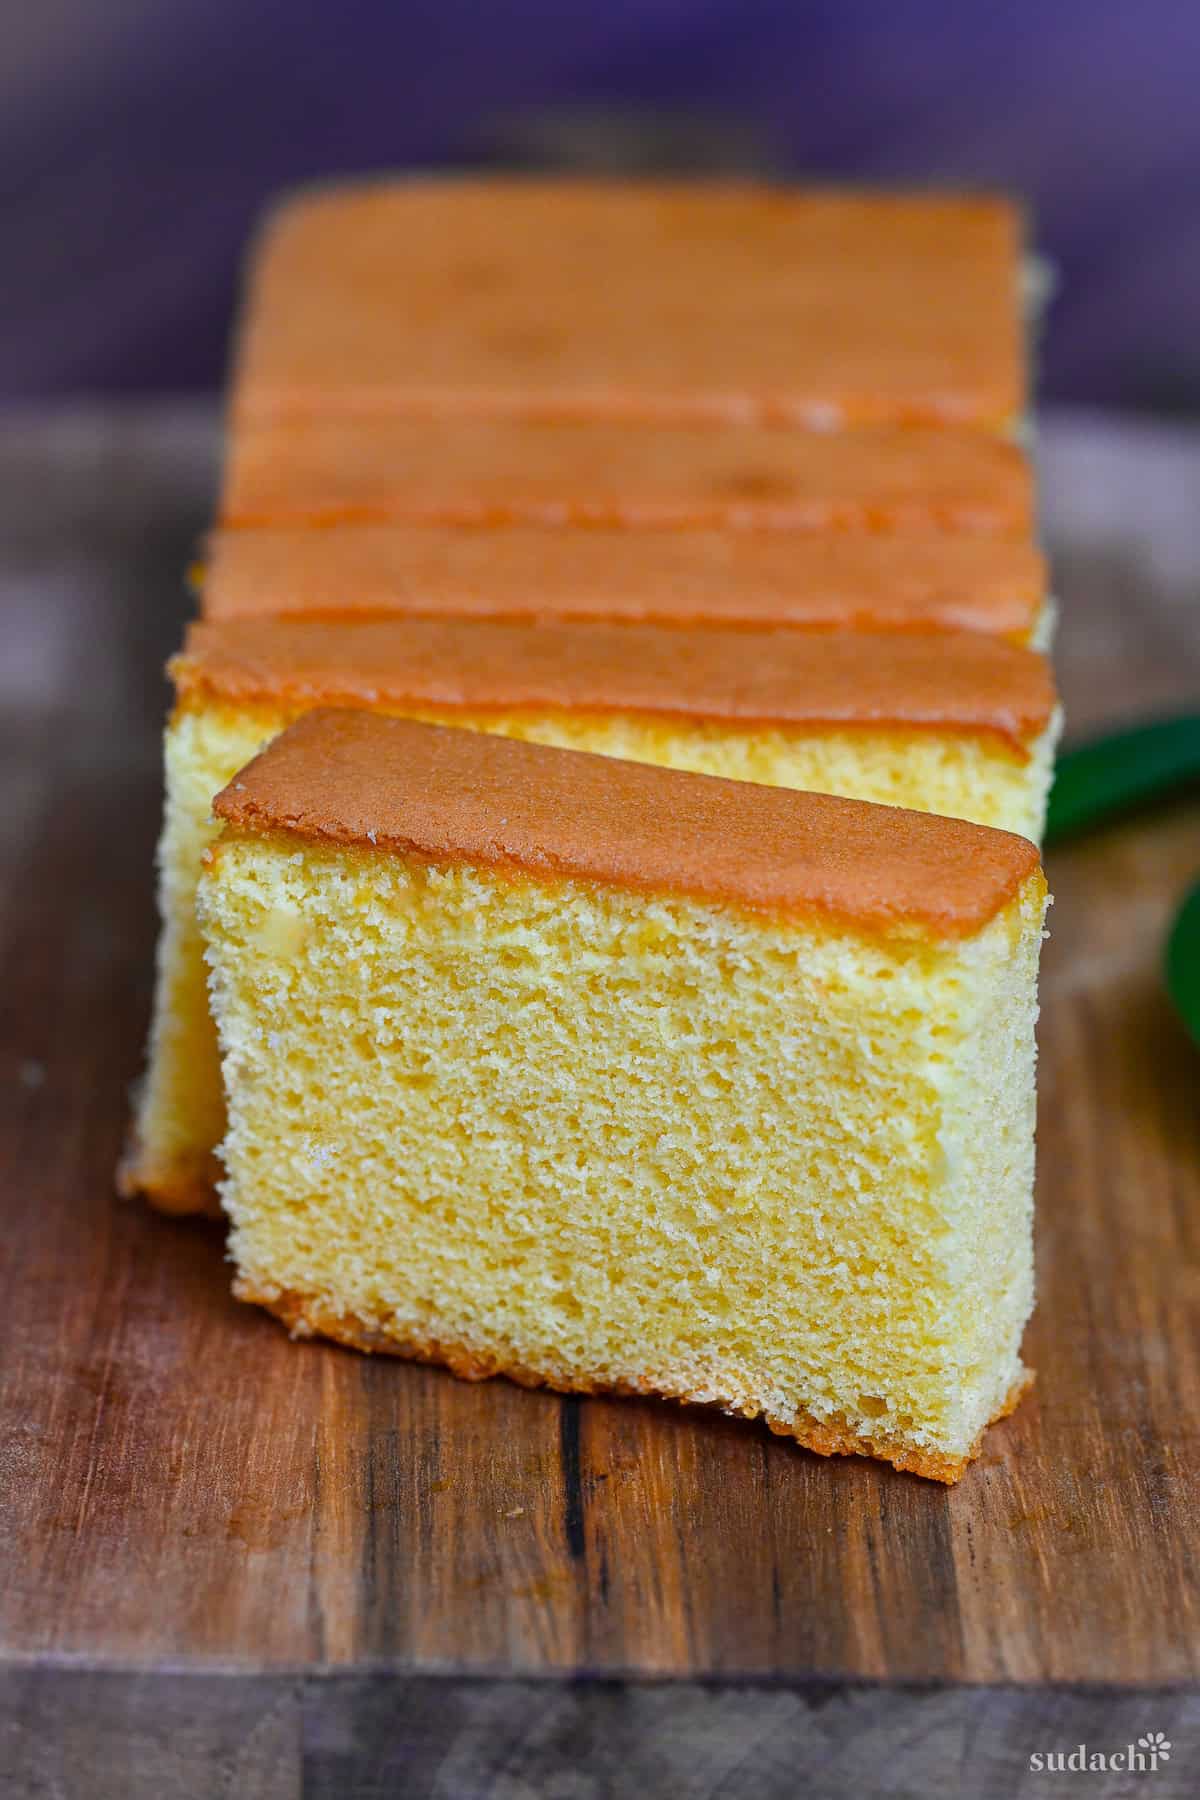
Japanese Castella Cake
Recipe Snapshot
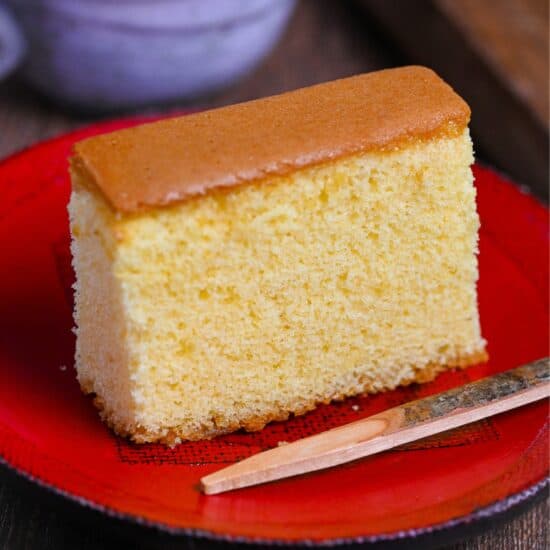
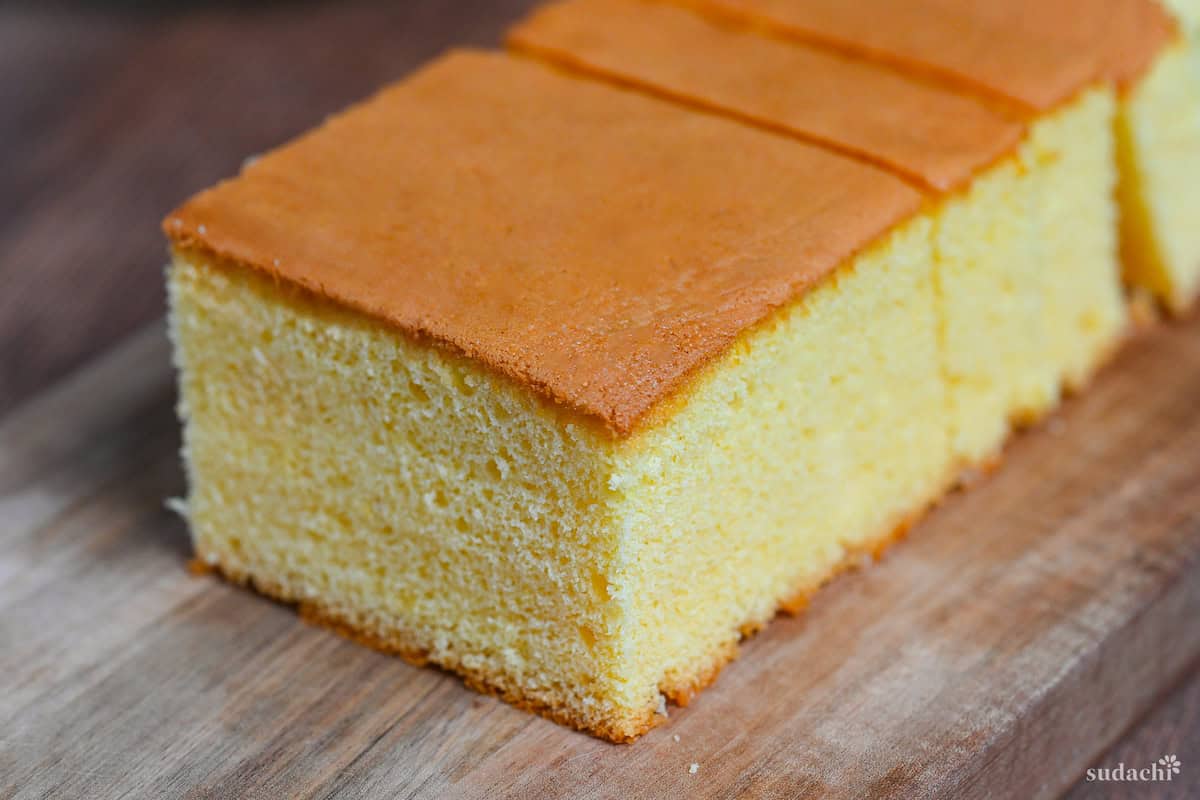
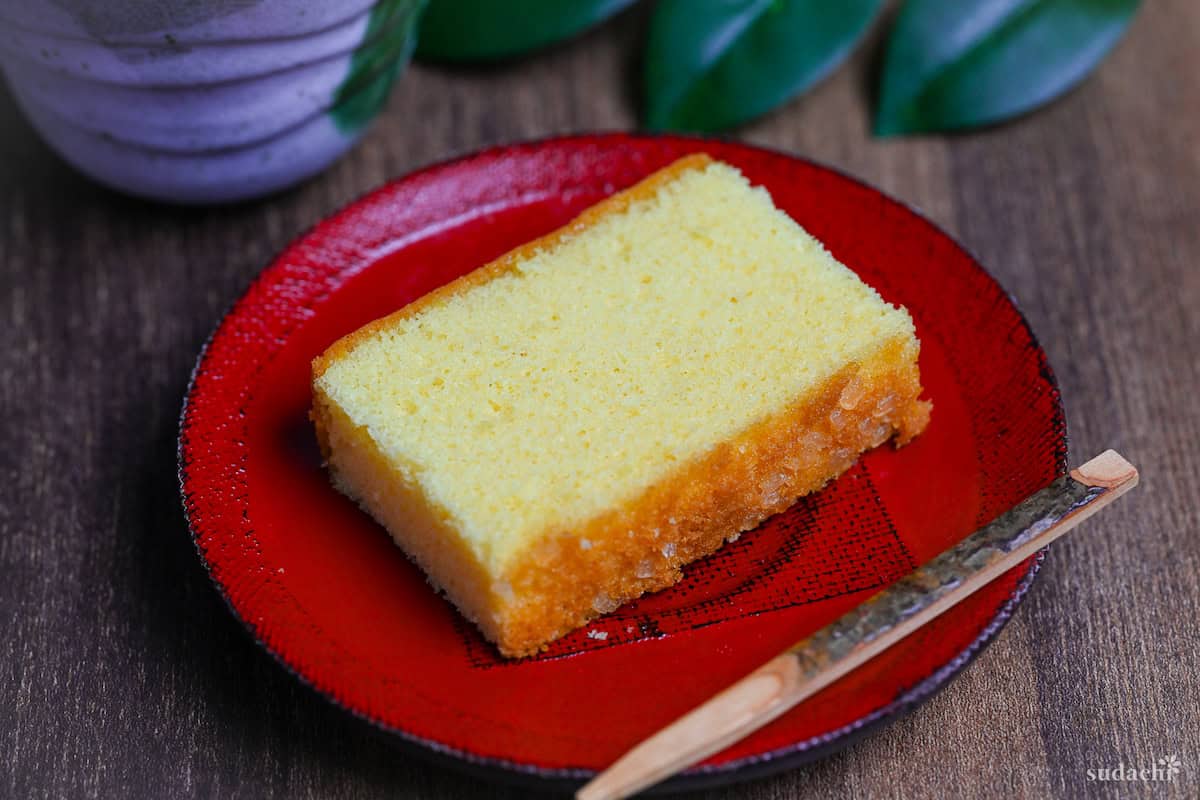
- What is it? A classic Japanese sponge cake with gentle honey flavor, soft but chewy crumb and smooth golden top.
- Flavor profile: Sweet, Honeyed, Buttery.
- Why you’ll love this recipe: You’ll be able to recreate authentic Japanese Castella at home with simple, everyday ingredients.
- Must-haves: 18cm (7″) square cake pan, baking paper, large airtight container (big enough to fit the whole cake)
- Skill Level: Medium
- Freezer Friendly: Yes!
What is Castella?
Castella (カステラ or kasutera) is a traditional Japanese sponge cake with over 400 years of history. The original version was first introduced by Portuguese merchants and Christian missionaries who arrived at the port of Nagasaki during the 16th century.
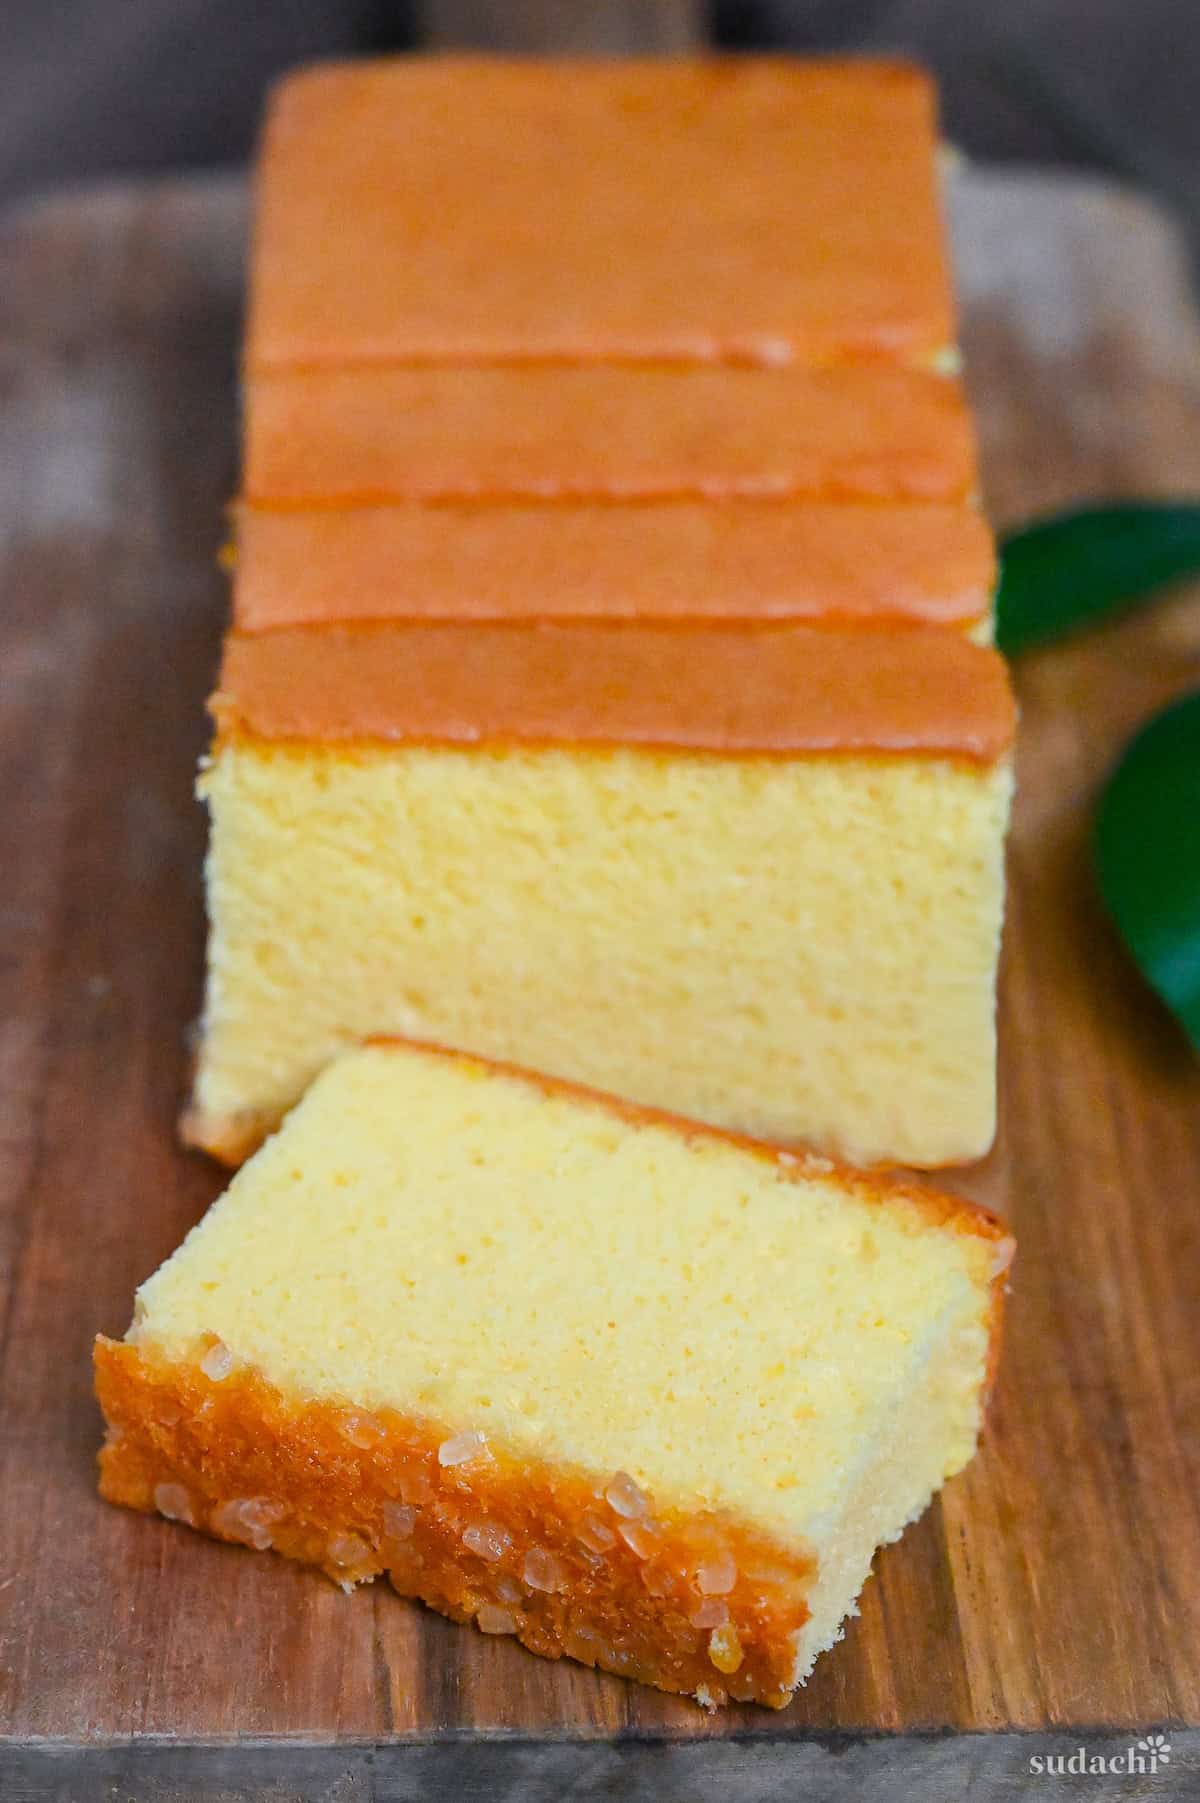
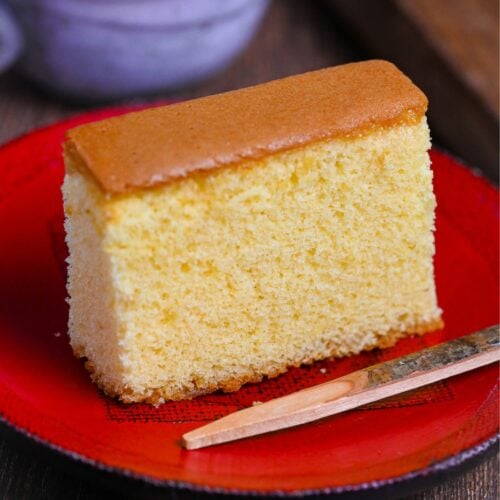
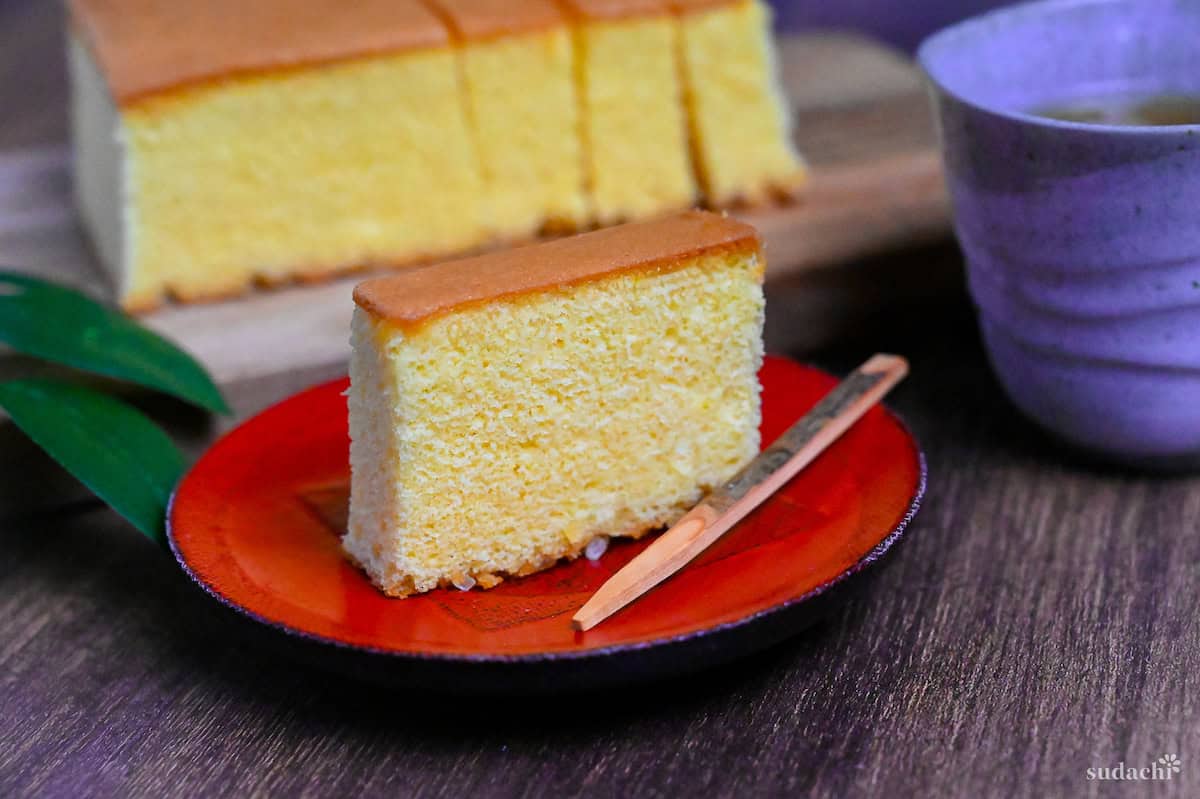
The defining characteristics of Castella cake are its smooth golden top, perfectly rectangular shape and intensely sweet flavor. It is also known for its texture, which is a beautiful balance of light and fluffy, yet moist, rich with a slight chewiness. This is achieved through the use of bread flour and whipped eggs, rather than using rising agents such as yeast or baking powder.
Castella is one of the most popular cakes in Japan and can be found in any supermarket or convenience store across the country. In my recipe I will show you how to make the best Castella at home, just like the ones you can get in Japan!
Castella Ingredients
What You’ll Need for Japanese castella cake
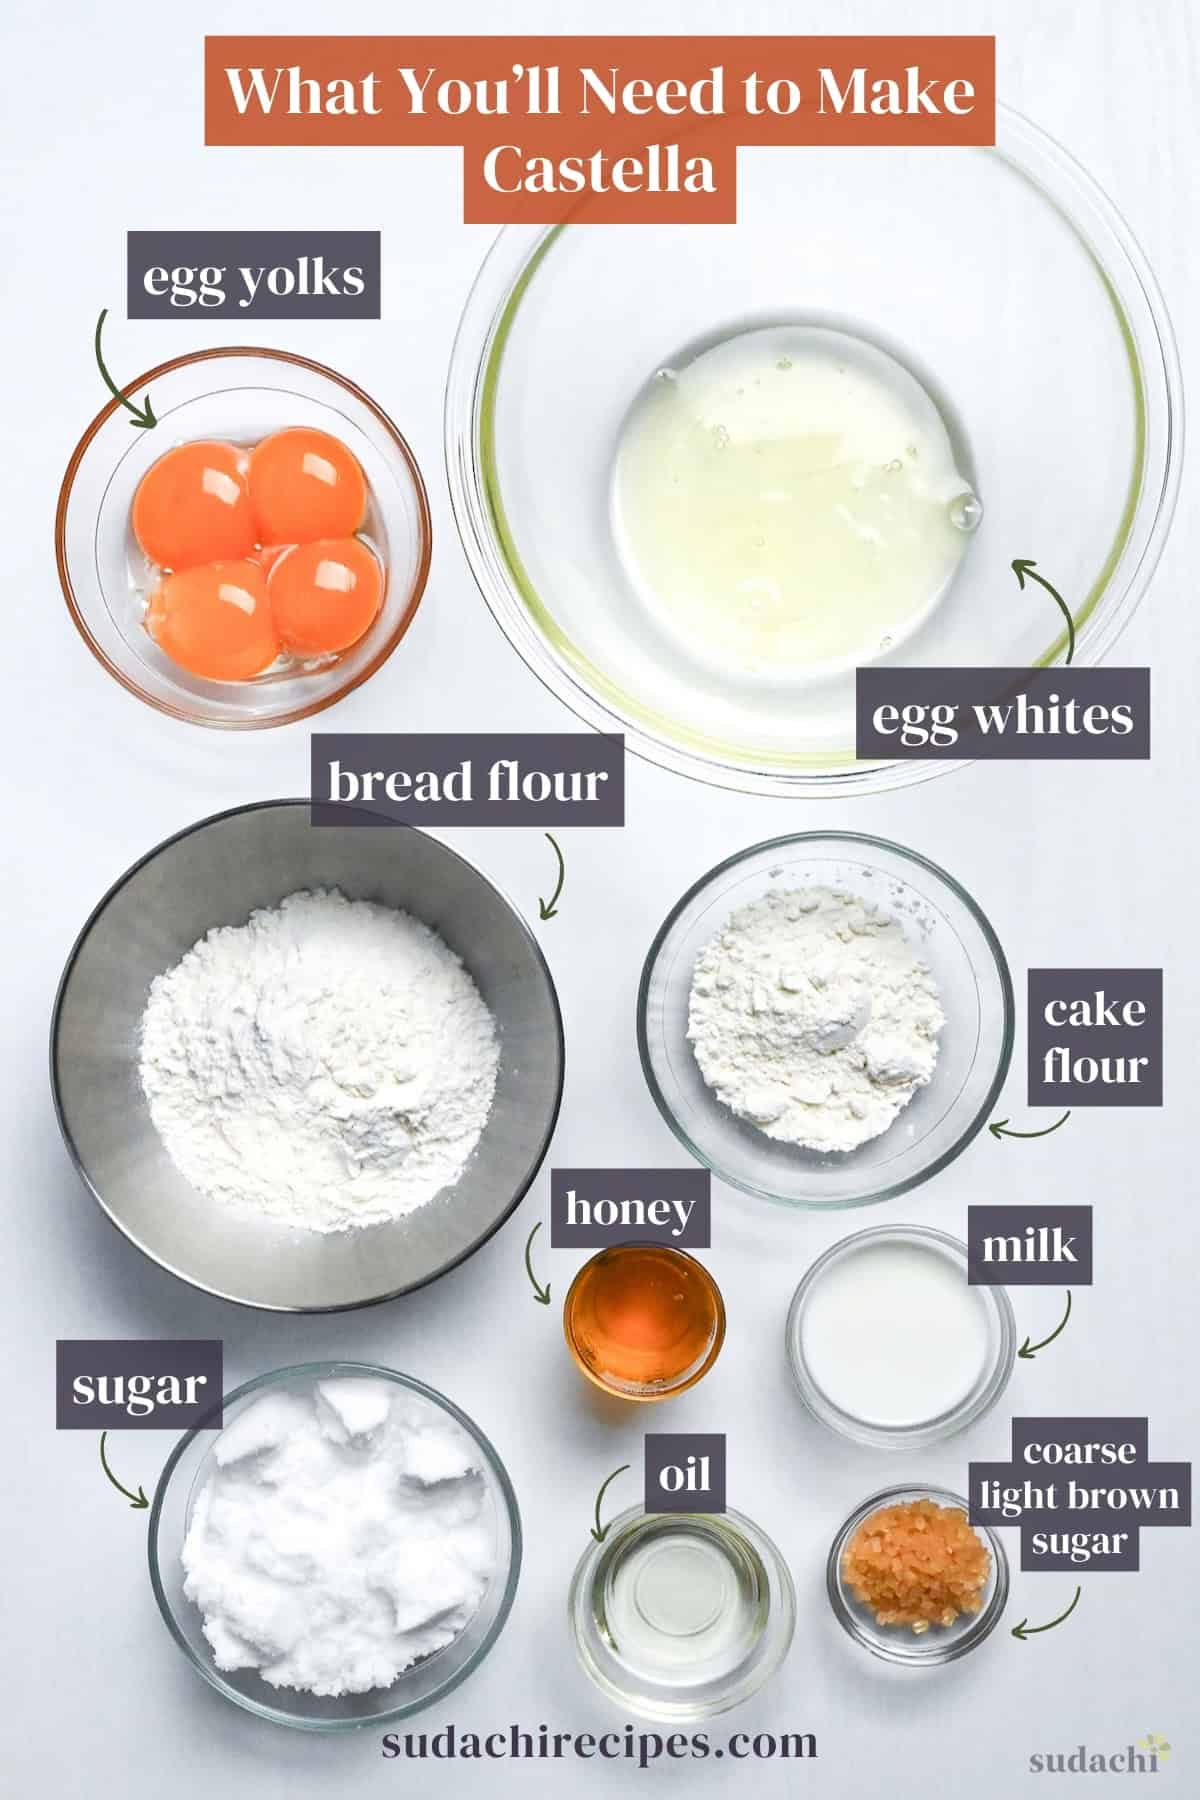
To make Japanese Castella Cake, you will need the following ingredients:
- Eggs: Castella cake doesn’t contain any chemical rising agents like baking powder or baking soda. The rise is reliant on whipped egg whites, and a higher egg yolk ratio is used to create a rich flavor and bold yellow color. I use large eggs, each white is approximately 34g and each yolk is about 17g.
- Flour: Traditional castella is typically made with bread flour to give it a stable and almost chewy texture, however I like to add a small amount of cake flour to give it a slightly lighter and fluffier texture.
- Sugar: Stick with white sugar for sweetness, caster or granulated both work fine. It is also typical to bake coarse sugar into the base for a crunchy texture. In Japanese, this sugar is known as “zarame”. Turbinado sugar is the best option for this as it doesn’t tend to melt when baked.
- Honey: Castella has a mild hint of honey flavor, the honey also adds moisture and a slight sticky texture. Although it’s not traditional, maple syrup is a suitable substitute.
- Milk and Oil: These liquids are added to soften the crumb and add moisture to the cake. Although melted butter can be substituted, the end result will be slightly drier.
Tools
- Electric whisk (to make meringue)
- 18cm square cake pan (two loaf pans can be used instead, but baking time will need to be adjusted)
- Baking paper (to line the cake pan)
- Plastic wrap (to wrap the cake and retain the moisture)
- Large airtight storage container (for cooling and retaining moisture)
Flavor Variations
Experiment with different flavors of castella cake! Here are a few ideas:
- Matcha: Replace 1-2 tbsp of flour with high quality matcha powder.
- Cocoa: Replace 1-2 tbsp of flour with high quality cocoa powder.
- Flavored essence/extracts: Can be added in small amounts.
- Lemon/Orange/Yuzu: Zest your choice of citrus and mix it with the sugar before starting the recipe. You can also add a few drops of flavored oil for a more intense flavor, but they are very concentrated so be careful not to over-do it.
- Coffee: Dissolve 2 tsp coffee powder in warmed milk, then add to the batter.
Avoid flavoring with lemon juice, orange juice or any other fruit juices as this will change the PH of the batter, affect the texture and produce unexpected results. This recipe is best adjusted with flavored powders or oils.
How to Make Castella Cake
Before you start: Separate the egg yolks and whites while they’re still cold, they’re less likely to break.
Measure out all of your ingredients and bring them to room temperature (including the eggs). This will help them combine more smoothly and prevent over-mixing.
Start heating your oven to 180°C (356°F).
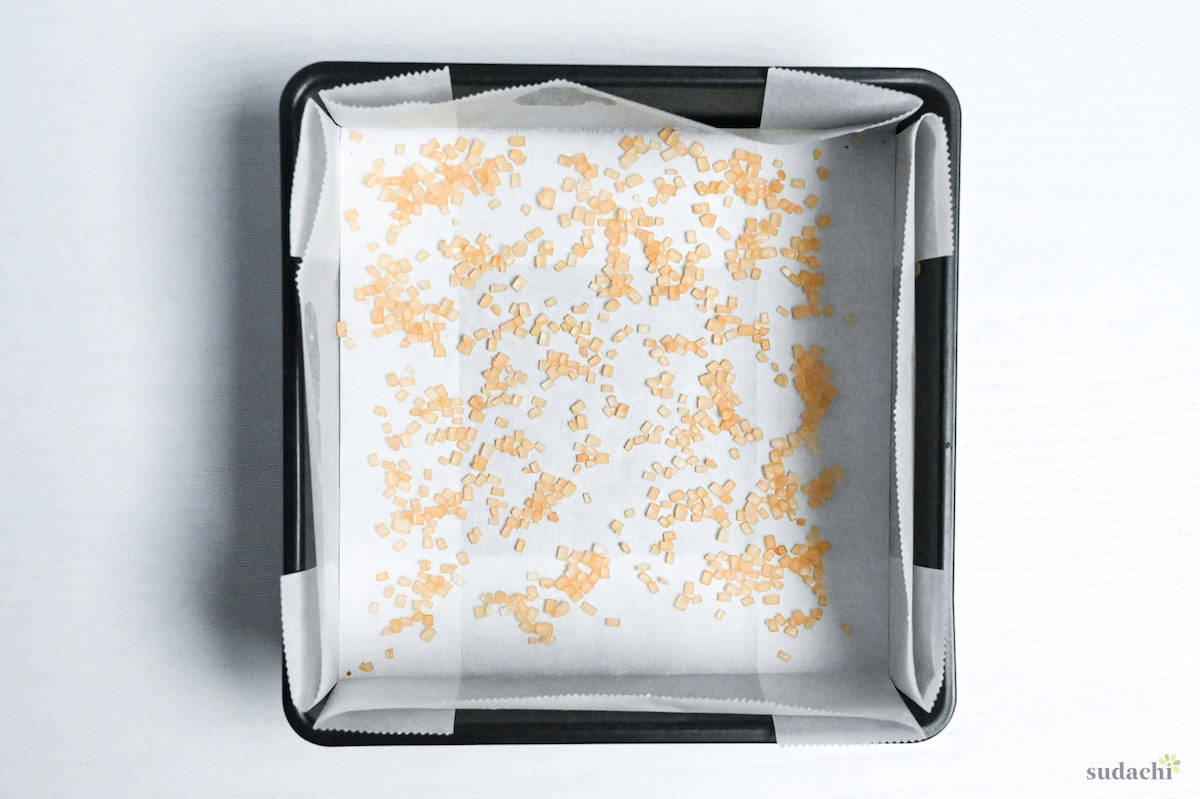
Line your cake pan with baking paper, and sprinkle the base with coarse sugar.
Place the egg whites in a clean, dry glass bowl. Any foreign objects (water droplets, oil, crumbs etc) can effect your meringue so a clean bowl is a must.
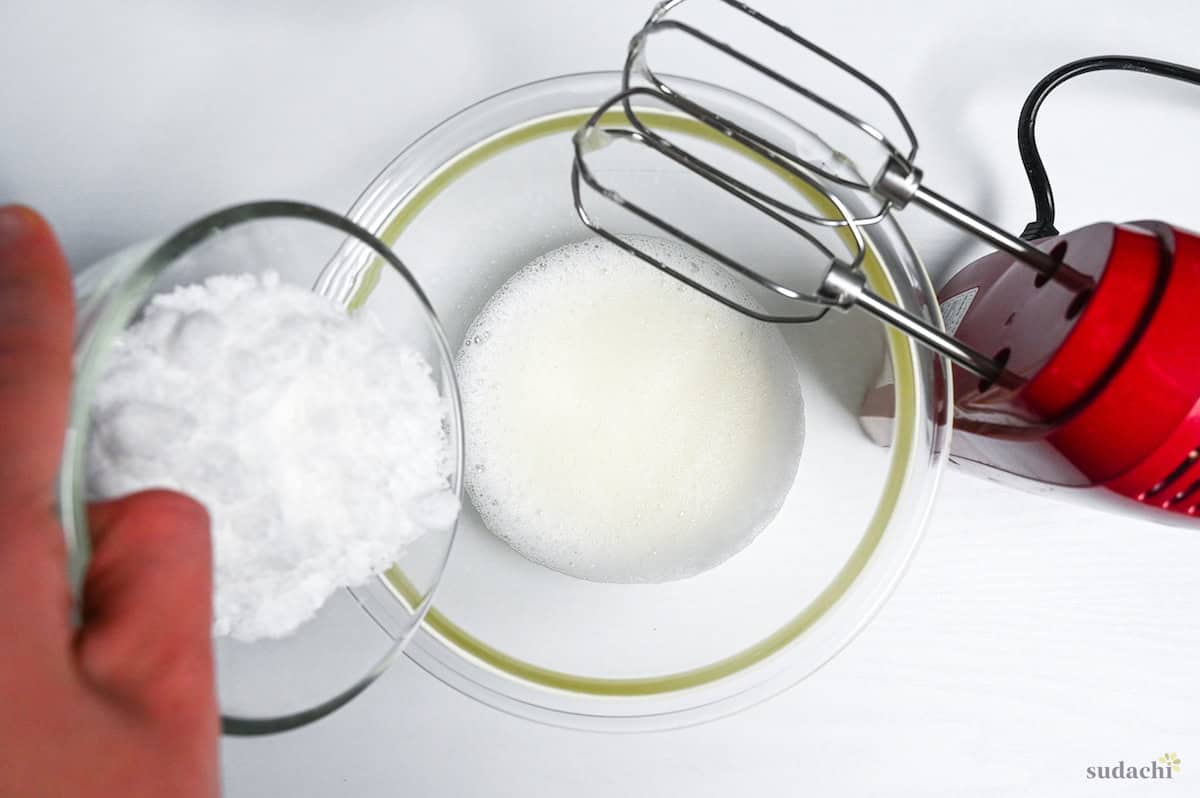
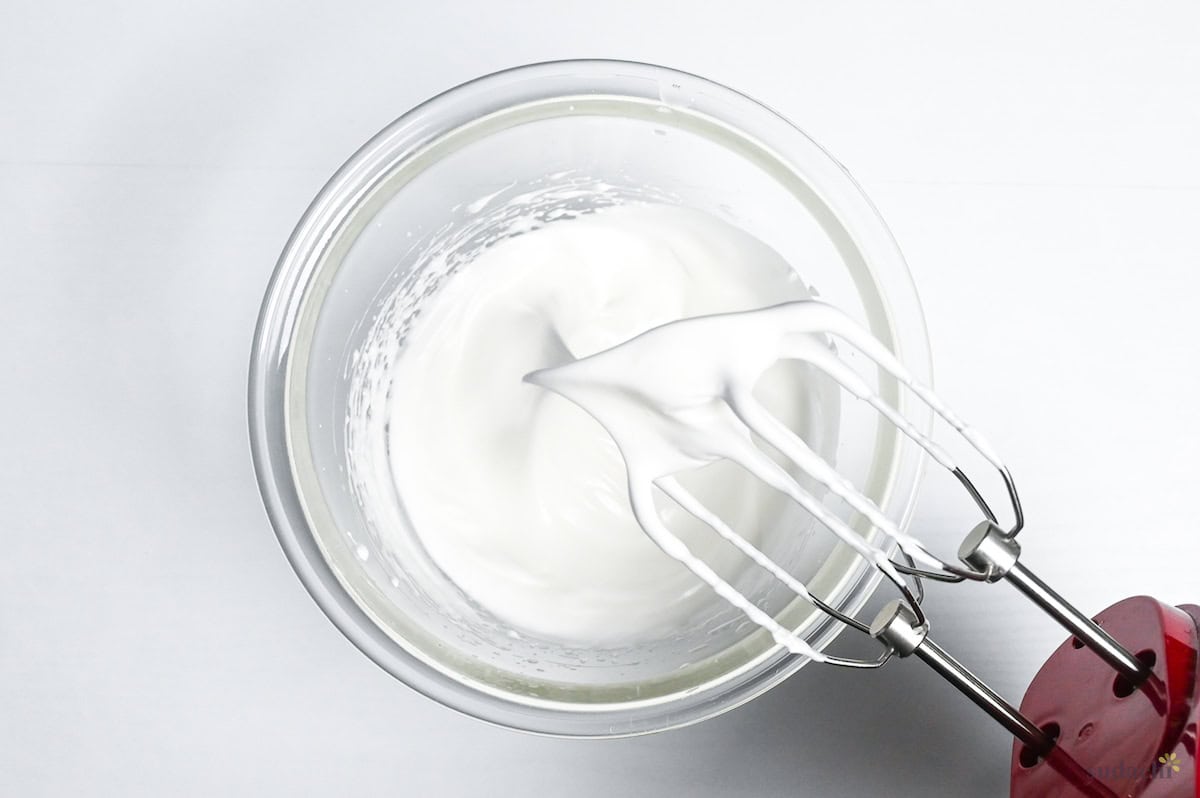
Whip the egg whites on a low/medium-low speed until foamy and doubled in size, then add the sugar one-third at a time. Wait until each third is well incorporated before adding the next. Once the sugar is incorporated, increase the speed to medium/medium-high and whip until stiff peaks form.
The peaks should point upwards without folding over.
Use a low or medium speed on your whipper. It will take longer, but the air bubbles will be small, stable and less likely to pop or deflate. It’s tempting to use a high speed to save time, but this will create large air bubbles which can either pop or create large holes in your cake.
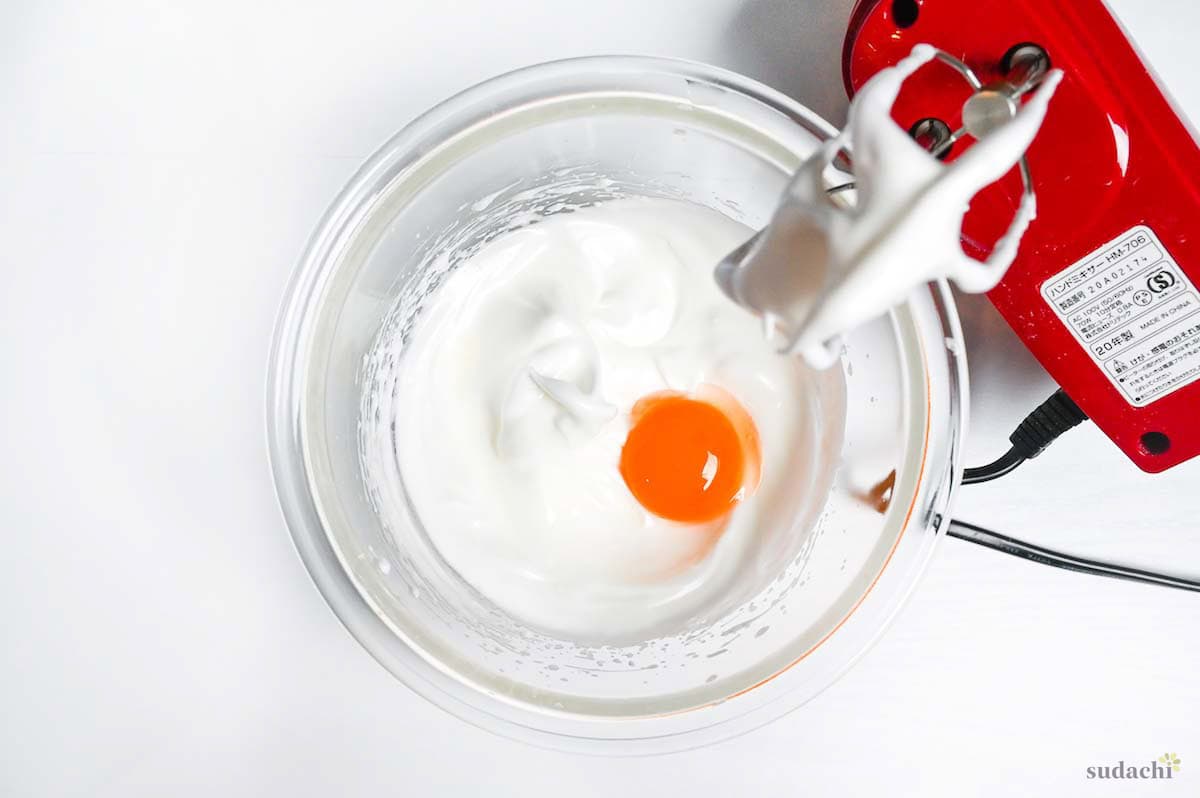
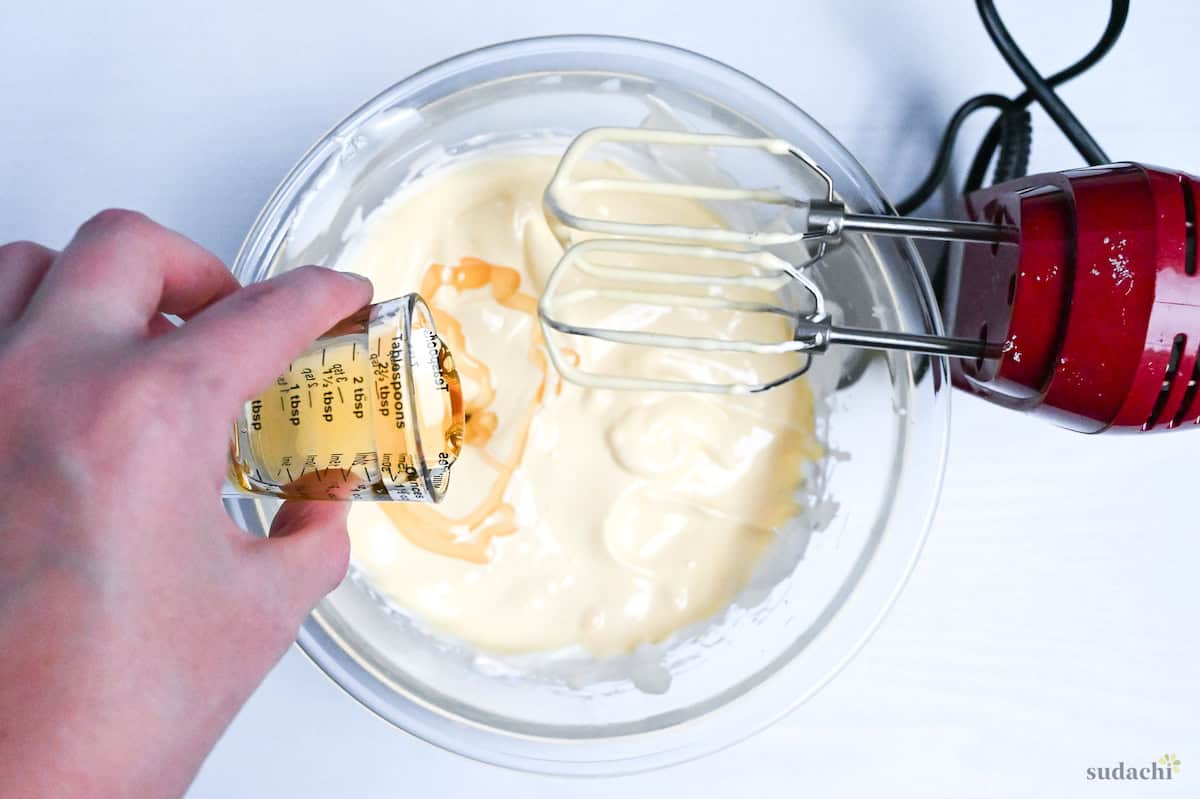
Add the yolks to the meringue one at a time and whip for 5-10 seconds to incorporate them.
Add the honey and whip for 5-10 seconds.
Sift the flour into a separate bowl to aerate it and break down any lumps.
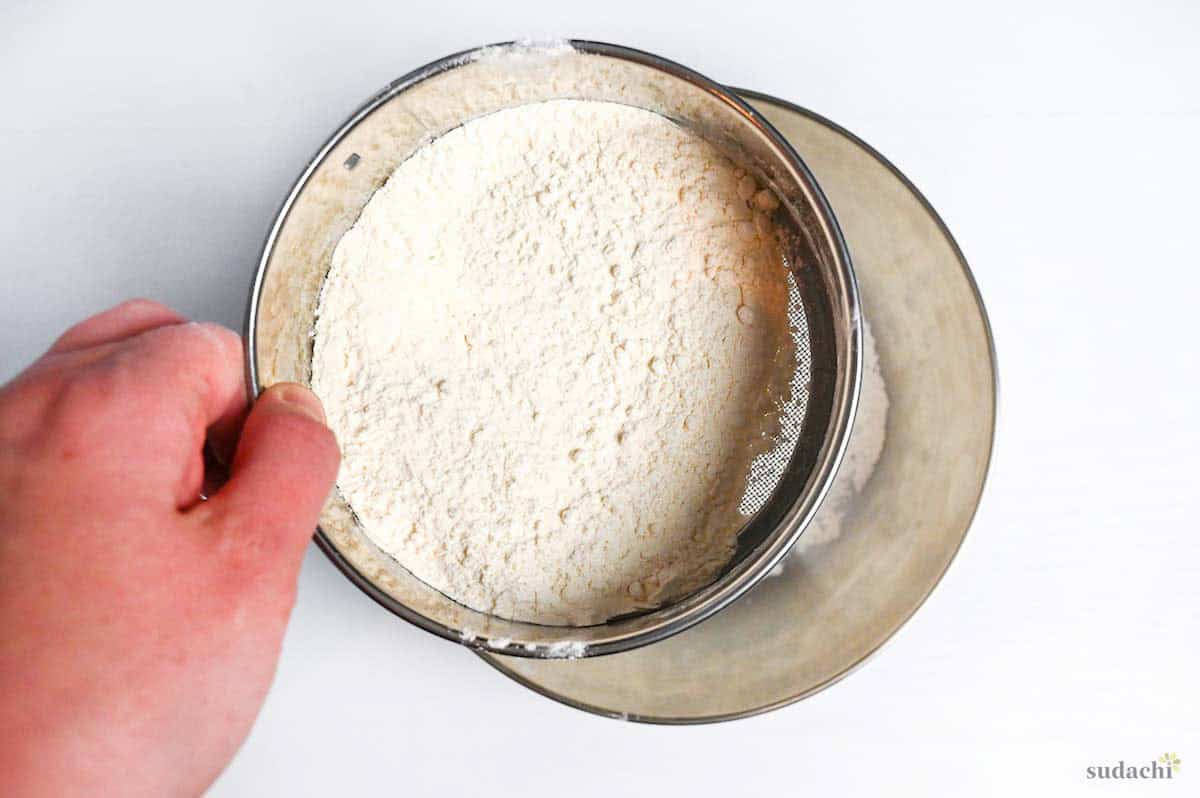
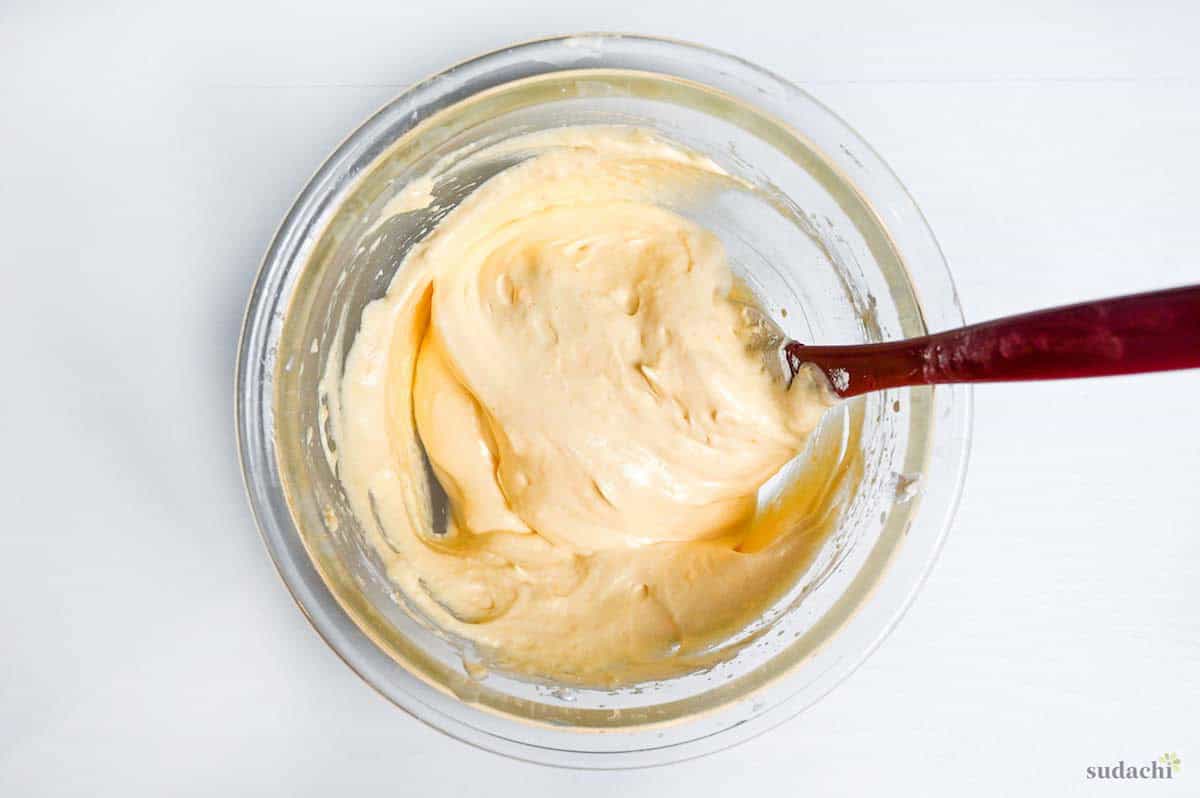
Sift the flour again, this time into the egg mixture. Add it one-third at a time and use a silicone spatula or similar tool to gently fold it in.

Whisk the milk and vegetable oil together in a small bowl. Add 2-3 tbsp of the cake batter to the bowl and whisk until combined.
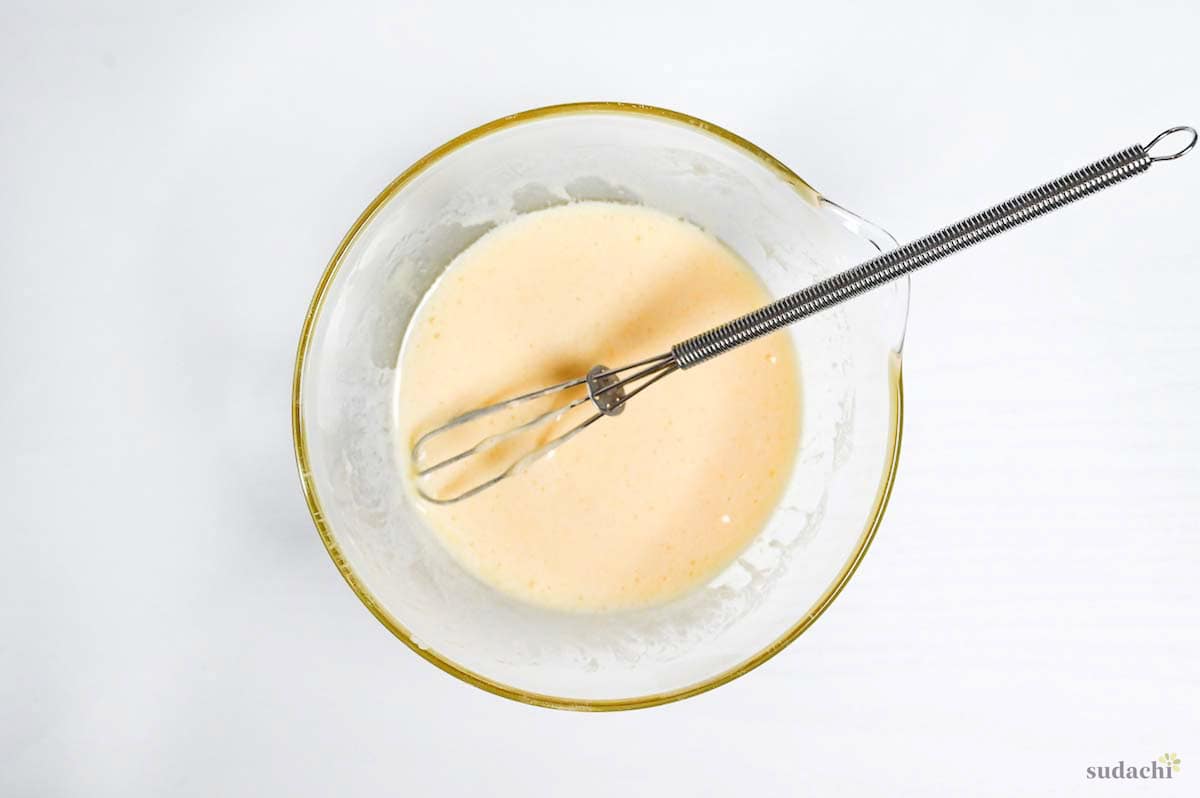
Pour the mixture over the spatula and into the batter, then carefully fold until combined.
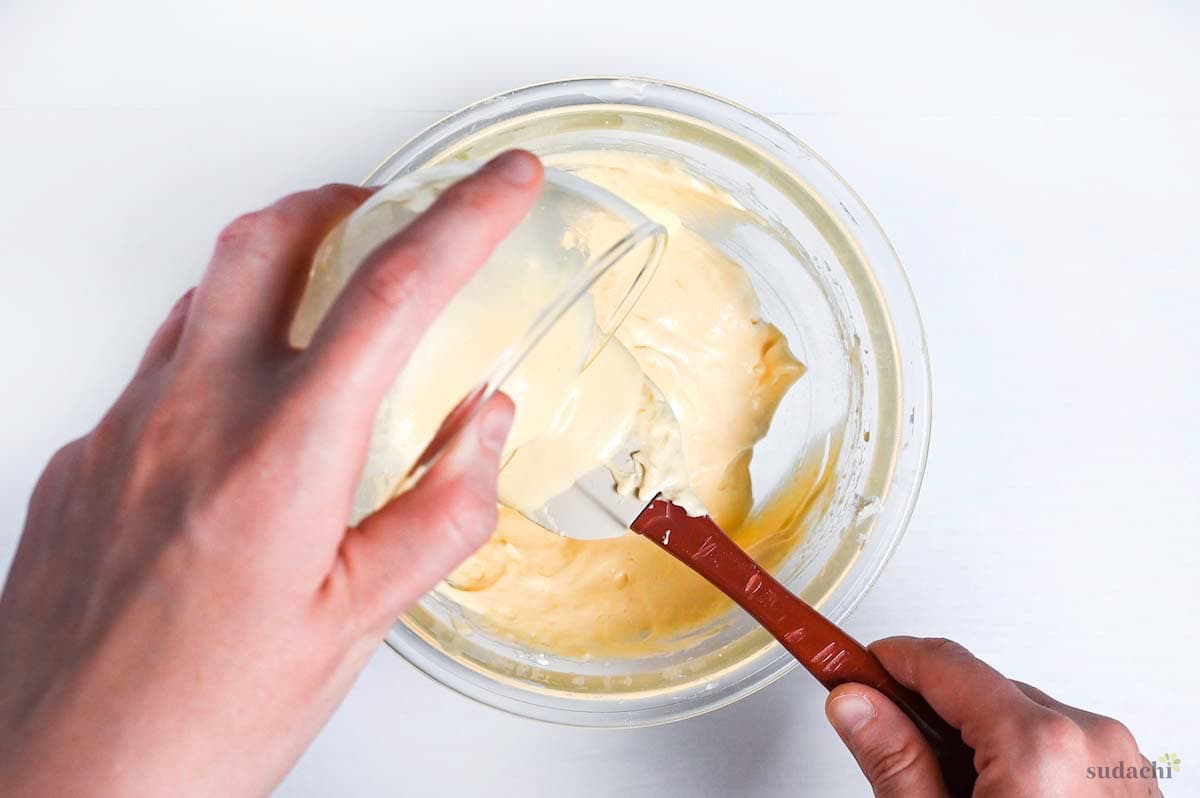
The final batter should be thick and smooth.
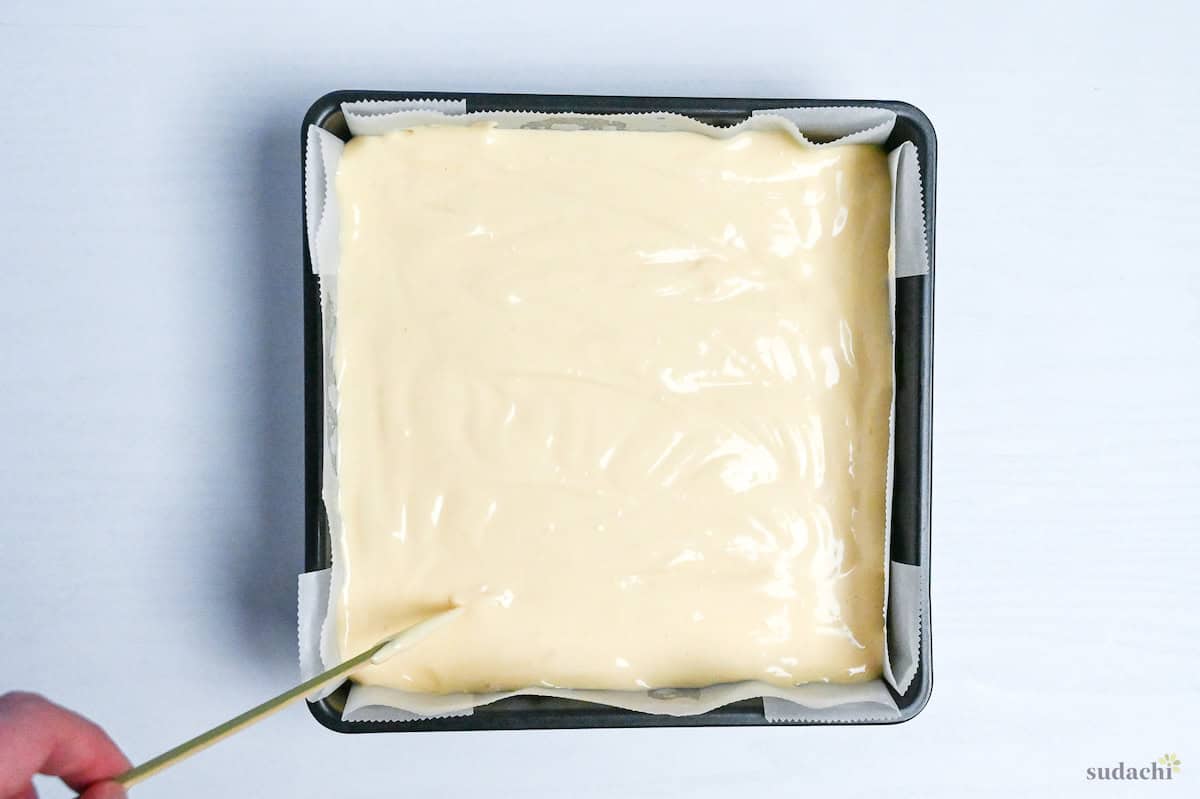
Pour the batter into the lined cake pan and drop it on the counter to pop any large air bubbles. Use a wooden skewer to draw crosses both horizontally and vertically three times.
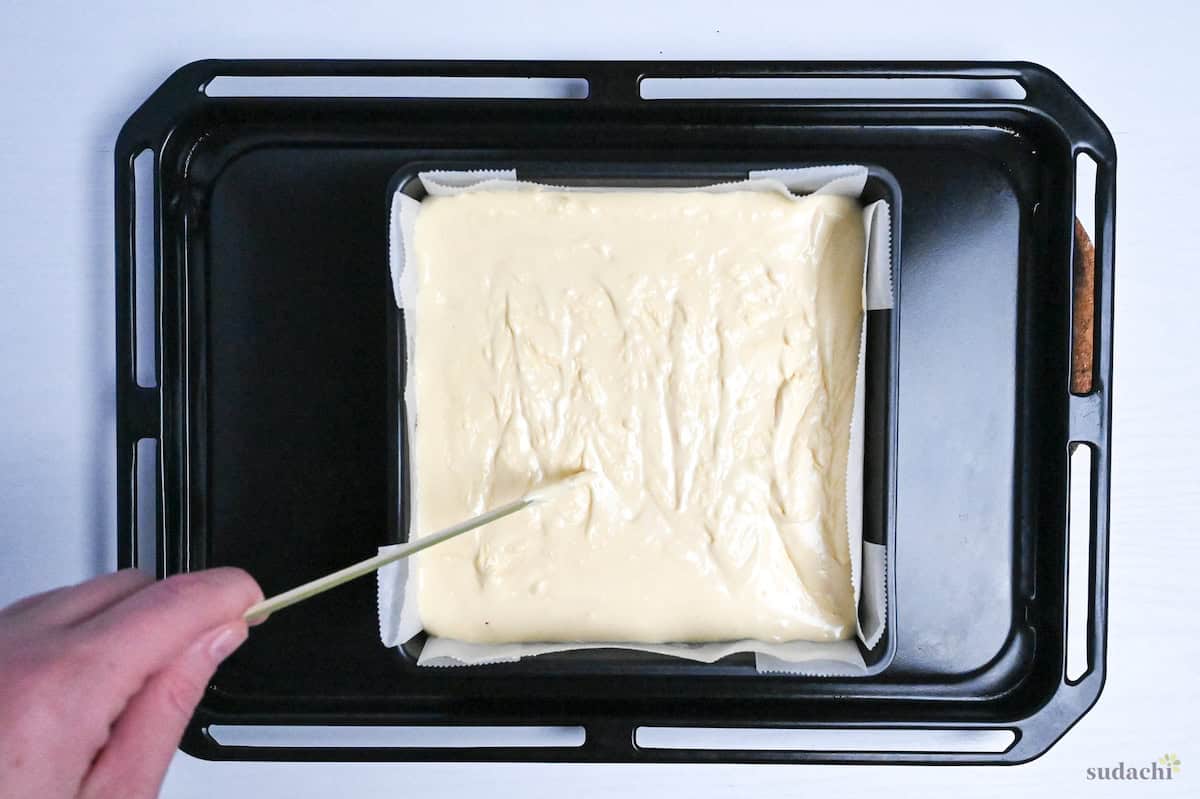
Place it on the top shelf and set a timer for 1 minute. Take the cake out and draw crosses horizontally and vertically again. Return to the oven for 1 minute, and repeat this step 3 times in total. This will help create a thicker crust on top.
After the final time, return to the oven, this time on the middle shelf and bake for 7 minutes.
After 7 minutes, reduce the heat to 160°C (320°F) and bake for another 30-40 minutes or until a skewer comes out clean. Check it around the 25 minute mark to be safe, baking too long will make it dry.
Tip: If your oven takes a long time to change temperature, try reducing the temperature after the first 3 minutes. Alternatively, after 7 minutes open the door slightly to let out some of the hot air. For better accuracy, consider buying an oven thermometer.
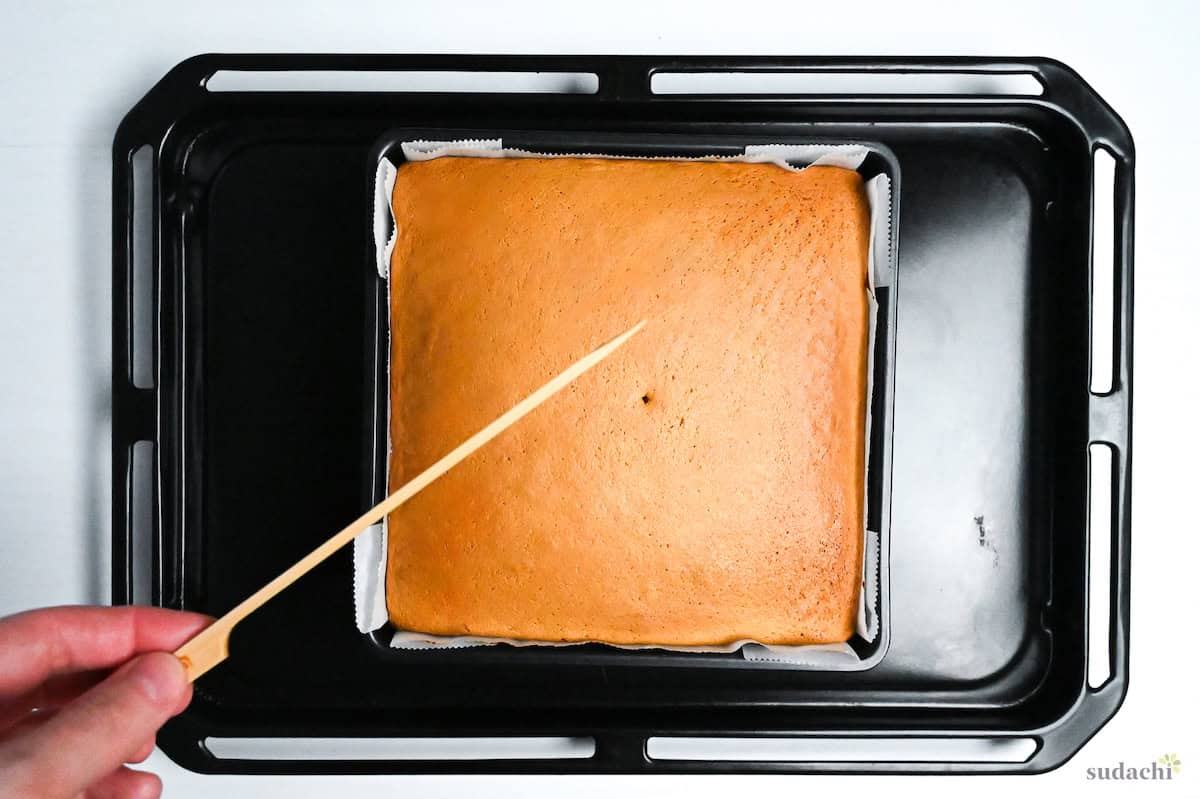
It’s cooked when a pierced skewer comes out clean.
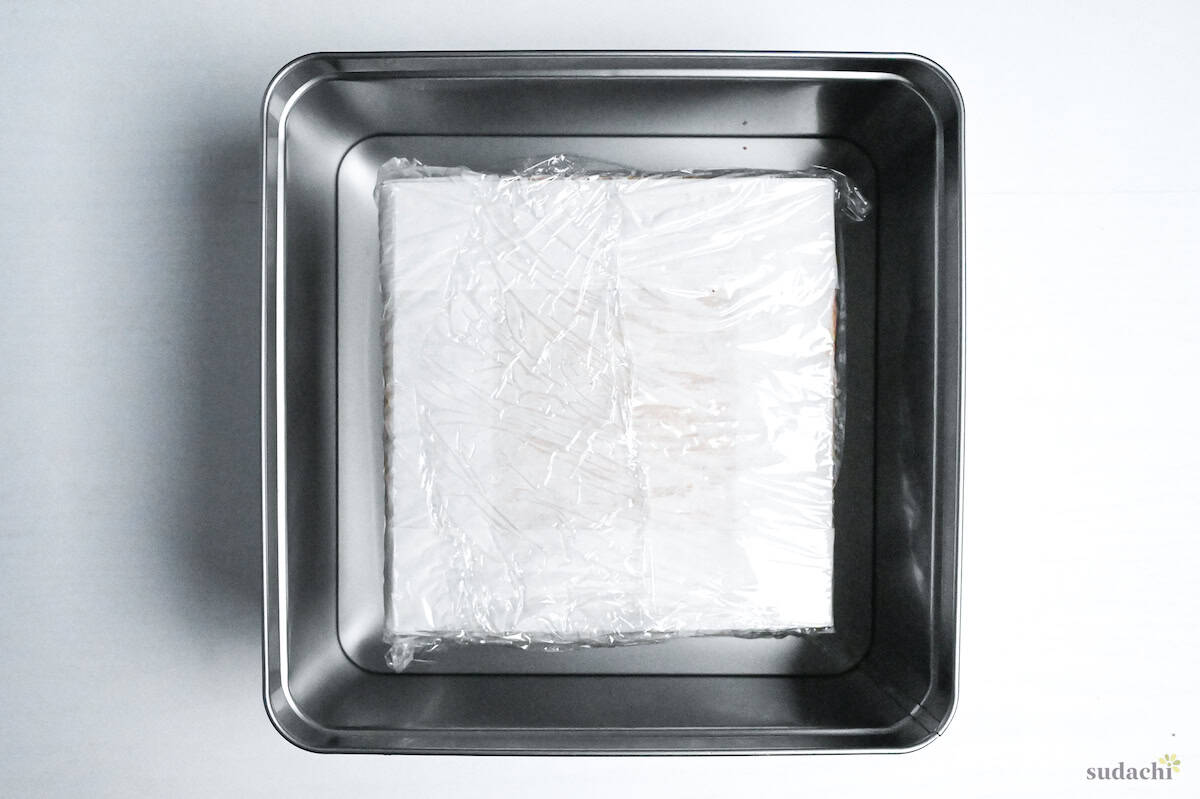
Once cooked all the way through, remove the castella from the oven, drop it on the counter and let it rest for a few minutes. Carefully remove it from the cake pan and wrap it with plastic wrap while it’s still hot – no need to remove the baking paper yet. This will help keep the moisture in the cake.
Place it upside down in an airtight container and leave it until the next day. If it’s summer or you live in a warm climate, it is better to cool it to room temperature and then store it in the fridge.
Castella needs at least 12 hours (preferably 24 hours) of resting time before being cut, since it is prone to drying out. Allowing it this resting time will ensure a deliciously moist castella cake.
Once the cake has rested for 12-24 hours, trim the edges.
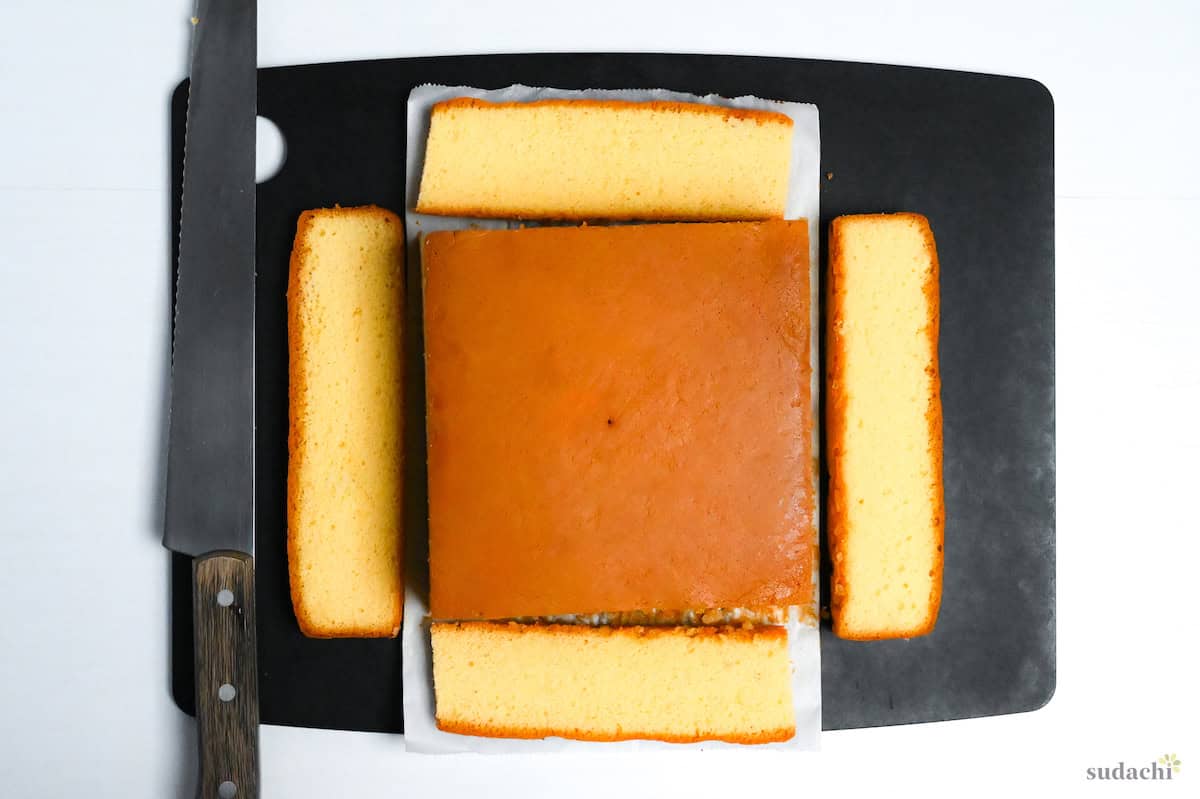
Cut it in half, then cut each half into thick slices about 2cm (3/4 inch) thick.
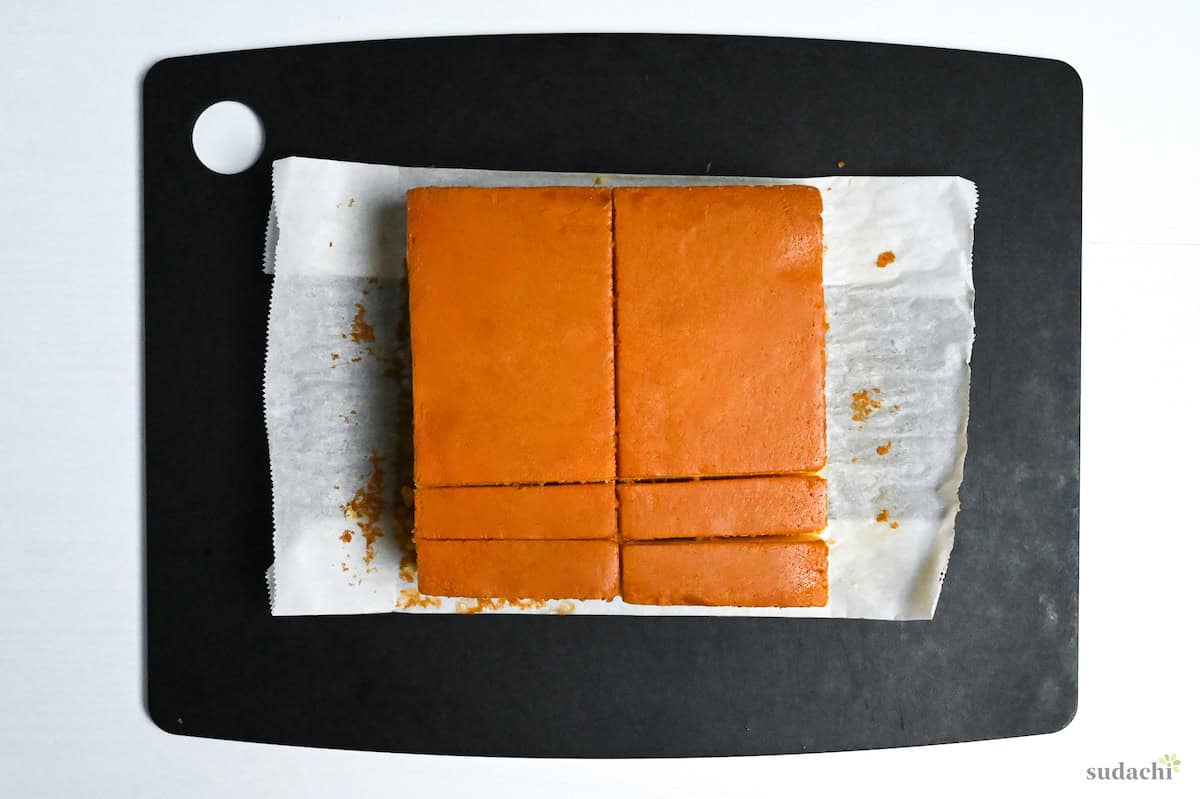
Tip: For clean cuts, use a sharp knife and wipe the blade between each slice!
Enjoy your homemade Castella Cake!

Essential Tips & Tricks
- Separate the egg yolks and whites while they’re cold for less chance of breaking.
- Bring all of your ingredients (including the eggs after separating) to room temperature for easier mixing. This will make it less likely to over mix.
- Whip the egg whites in a clean, dry glass bowl. Bits of egg yolk, shell, oil or crumbs can stop the meringue from forming.
- When whipping the egg whites, start with a low or medium-low speed to form stable micro-bubbles.
- For stable and fluffy results, whip to stiff peaks that point up straight.
- Fold in the sifted flour with a spatula and add it one-third at a time to prevent over-mixing. Mixing too much will push the air out of the batter and make it dense.
- This recipe starts with a higher oven temperature which is then reduced. If you oven takes a long time to adjust to temperature changes, reduce the temperature earlier or open the oven door slightly to let out some heat.
- Wrap and rest for 12 hours to trap moisture into the cake.
With these tips in mind, you’re set for success every time you make Japanese Castella!
Troubleshooting / FAQ
Baking is a science and there are so many variables that can change the results of your cake. Here are some of the most common problems that come up when making castella cake and their potential causes and fixes.
Incorrect meringue: Since we rely on the eggs for the rise instead of baking powder or other rising agents, it’s crucial to get the meringue to the right consistency. If you don’t whip it enough there won’t be enough air or stability to help it rise. That said, if you whisk too much after it reaches stiff peaks, you risk losing the air you’ve created. It’s quite a delicate process. For best results, whisk until the meringue reaches stiff peaks that point up, rather than folding over.
Over mixing: Mixing the batter too much after adding the flour, oil and milk can also lead to a dense sponge. Switch to a spatula right after the honey is mixed in with the eggs and add the flour in 3-4 parts to prevent the need for vigorous mixing.
Too much flour: I purposely avoid using cup measurements for baking since the results are not consistent. Follow the metric measurements for the most consistent results.
Baking at a too high temperature: This recipe starts with a higher temperature to color the top, then is reduced to a lower temperature to finish baking the cake without drying it out. If your oven takes a long time to adjust to temperature changes, you could accidentally over bake it. In this case, reduce the heat earlier (after 3 minutes) or alternatively, crack the oven door open slightly after 7 minutes to let out some of the hot air and allow it to reduce faster (just be careful not to let out too much – drastic temperature changes are also not good).
Oven temperature too high: This recipe starts with a higher temperature to color the top, then is reduced to a lower temperature to finish baking the cake without drying it out. If your oven takes a long time to adjust to temperature changes, the top can cook too quickly and crack as the middle rises. In this case, try reducing the heat earlier (after the initial 3 minutes) or open the oven door just slightly when you reduce the temperature to let some of the hot air out so it can adjust faster (just be careful not to let out too much – dramatic temperature changes can cause other problems).
Too many egg whites: If your eggs are especially big, it could make the cake rise more than it’s supposed to and cause the top to crack. I’ve adjusted the recipe card to state the exact weights of egg whites used in this recipe.
Pan is too small: If the pan is too small, this can restrict the cake’s rise and cause it to crack in the middle. I use a 18x18cm (7″) square pan for this recipe. If using a different shape pan (loaf pan or similar), you might need to adjust the baking time or temperature. I will update the recipe with more details when I test the recipe in a loaf pan.
Yes, you can swap 1-2 tbsp of flour for powdered flavors of your choice (matcha, cocoa, etc). Small amounts of concentrated flavored essence, extract or oil can be added too (vanilla essence, orange oil etc) but only add a few drops. Avoid adding fruit juices as this will change the chemical balance and texture of the cake.
How to Store
Room Temperature: In cooler climates or fall/winter, Homemade Castella Cake can be kept for 3-4 days in an airtight container.
Fridge: In summer or warmer climates, it is better to keep it stored in an airtight container the refrigerator. This way it can be kept for up to 1 week.
Freezer: Cut and wrapped individual slices with plastic wrap, then place in a sealable freezer bag to prevent freezer burn. This method of storage will extend the life to 1 month.
Thawing: Due to Castella’s high sugar content, it will not freeze completely so it can actually still be enjoyed frozen. However, if you would prefer to thaw it, you can microwave for 10-15 seconds to quickly defrost it, or thaw slowly in the refrigerator for a few hours.
More Japanese Cake Recipes
- Japanese Strawberry Shortcake
- Spiced Kabocha Loaf Cake
- Matcha Pound Cake with Adzuki Beans
- Japanese Steamed Cakes (Mushi Pan)
Want more inspiration? Explore my Japanese Desserts Roundup Post for a carefully selected collection of tasty recipe ideas to satisfy your next sweets craving!
Did You Try This Recipe?
I would love to hear your thoughts!
💬 Leave a review and ⭐️ rating in the comments below. 📷 I also love to see your photos – submit them here!
Japanese Castella Cake (Kasutera)
Equipment
Ingredients
- 1 tbsp coarse sugar turbinado or similar
- 100 g bread flour
- 20 g cake flour
- 3 egg whites approx 35g/1.25oz each
- 120 g white caster sugar
- 4 egg yolks approx 17g/0.6oz each
- 40 g honey
- 30 ml whole milk
- 30 ml cooking oil any neutral oil, I used canola
My recommended brands of ingredients and seasonings can be found in my Japanese pantry guide.
Can’t find certain Japanese ingredients? See my substitution guide here.
Instructions
- Before you start, measure out your ingredients and separate the egg yolks and whites into separate bowls. Cover and bring to room temperature. Line an 18cm (7") square cake pan with baking paper with slightly overlapping edges. Sprinkle 1 tbsp coarse sugar across the baking paper and set aside for later.

- Start preheating your oven to 180 °C (356 °F). Sift the 100 g bread flour and 20 g cake flour into a bowl and set aside.

- Pour 3 egg whites into a clean, dry glass bowl and whip on low/medium-low setting until foamy and doubled in size. Add 120 g white caster sugar in 3-4 additions, making sure it's fully incorporated before adding the addition. Scrape down the sides of the bowl occasionally. Once incorporated, increase the speed to medium/medium-high.
- Whip until you have a meringue with stiff peaks that stand up straight.
- Add 4 egg yolks one at a time and whip for 5-10 seconds each to incorporate.
- Drizzle 40 g honey into the meringue and whip for 10 more seconds before switching to a spatula.
- Sift the flour into the batter one-third at a time and gently fold with a spatula to prevent losing too much air.
- In a small bowl, whisk 30 ml whole milk and 30 ml cooking oil together. Take 2-3 tbsp of the cake batter and add it to the bowl. Whisk them together until incorporated.
- Pour the mixture over a spatula and into the cake batter, then gently fold until combined. The final batter should be thick and smooth.
- Pour the batter into the lined cake pan and use a bamboo skewer to draw lines across the surface, moving back and forth in a zigzag motion. Do this in both directions 3 times, then drop the pan on the counter to pop any large air bubbles. Place on the top shelf of the oven and bake for 1 minute.
- After one minute, take the cake out and draw lines in both directions again. Return to the top shelf and repeat twice more. After the third time, smooth out any lumps and then move the pan to the middle shelf and bake for 7 minutes. Reduce the heat to 160 °C (320 °F) and bake for about 30-40 minutes. (See note).
- Check on it around the 25 minute mark. The castella is done when a pierced skewer comes out clean. Once baked, drop on the counter to shock and prevent shrinking. Cool for a few minutes, then carefully pull it out of the pan.
- Without removing the baking paper, wrap the whole castella cake with plastic wrap while it's still hot/warm, then place it upside-down in a large airtight container and rest for 24 hours. If you live in a hot climate, let it cool to room temperature then store it in the fridge.
- After 12-24 hours of resting, unwrap the castella and trim the edges.
- Cut in half, then cut each half into thick slices. Use a sharp knife and wipe between each cut for a clean finish.
- Enjoy!
Notes
- Separate your eggs while they’re still cold to prevent broken yolks, then let everything come to room temperature before you start the recipe for easier mixing.
- Use a low or medium speed to whip the meringue, this will create more stable micro-bubbles.
- Whip the eggs and sugar to stiff peaks that stand up straight. This helps the cake stay fluffy and stable.
- Be careful not to over mix when you add the flour.
- If your oven takes a long time to change temperature from 180 to 160℃, reduce the heat after moving the cake to the middle shelf (3 minutes) and bake for 37-47 minutes. Alternatively, after 7 minutes at 180℃, open the oven very slightly to let out some of the hot air when you reduce the temperature. Just be careful not to open it too wide and change the temperature too drastically.
- Store in an airtight container at room temperature for 3-4 days, 1 week in the refrigerator or wrap individual slices and store for up to 1 month in the freezer.
Thank you for this wonderful recipe! My mom and I made this yesterday and it came out perfect!
Hi Tisha,
Thank you so much for trying this recipe! I’m happy that it came out great! I hope you and your mom had fun time making it too! 🙂
Yuto
What if i want to add flavor such as orange. What other ingredients should i need to adjust to incorporate the additional orange juice? Hope you could help!
Hi Eri,
I don’t recommend adding orange juice because it changes the PH of the batter and changes the texture of the cake.
For orange flavor I recommend adding orange zest or orange extract. I’ve heard of some people blitzing their sugar with orange peel to flavor the sugar, or even simmering orange peels in the milk but I haven’t tried them myself so I can’t say how effective they are.
I do plan to experiment with other flavors of castella in the future so I’d love to hear how it goes. Good luck and I hope you enjoy the recipe!
Yuto
This is a delicious cake! I won 3rd place in a bake-off at work with this recipe
Hi Clark,
Love hearing that! Congratulations on your bake-off success, so happy this recipe was part of it! 🙂
Yuto
Hello,
Trying this recipe today but I have one question: Must I leave the parchment when wrapping the cake in plastic?
Thanks, Eloisa
Hi Eloisa!
Yes, I recommend leaving the parchment paper on when wrapping. It helps prevent tears/breaks and drying out.
Hope you enjoy the recipe!
Yuto
i think there has to be some error in the ingredients. the amount of egg white in this recipe, compared to like a dozen other recipes is significantly less. its literally like half of what many other castella recipes use. i made this and immediately knew the batter was thicker than what i expected from my old castella recipe and stiffer than other castella video recipes. the resulting finished cake the next morning was too dense and stiff, because of the lack of enough egg white to give it more airiness. ill try this again, adding a little more egg yolk and a lot of more egg white. to illustrate what im trying to say, you list in your ingredients to use 3 egg whites. a normal large egg contains about 34 grams of egg white, so 3 egg whites would be 102 grams. now, some recipes use a lot of egg, creating more of a souffle, which i am not a fan of, but even the recipes which use less, use at minimum 150 grams compared to your suggested 102 grams (justonecookbook recipe). thats a full 1 1/2 more egg whites which is significant. i dont know what size of eggs you are using lol, but you should probably list the weights of both the egg yolk and whites and maybe re-look at this recipe.
Hi David,
Thank you for your honest feedback and I’m sorry to hear that the recipe didn’t work for you.
I’ve rechecked the recipe and the egg amount is correct, but I will be making a video for this castella recipe soon so I will double check the weight of the eggs and add it to the recipe card.
I remember when I developed this recipe, and as you say, I didn’t want it to be souffle-like so I purposely didn’t use as many eggs as other recipes.
A dense and stiff cake could be caused by a number of reasons, not purely the egg amount. I will update the post with a troubleshooting section after further testing.
Thank you again,
Yuto
Hi David,
Just checking back to let you know I retested the recipe and didn’t find any problems with the egg amount. I’ve updated the recipe card with egg weights and added a troubleshooting section.
All the best,
Yuto
am from Malawi I would love to learn more about all your recipe to get best of results
Thank you!
Good
Thank you, Anar!
can you add strawberry puree to this recipe? thanks
Hi Fezzan, I wouldn’t recommend it, purees add extra liquid to the batter and I don’t know how that effects the texture of the cake.
If you want strawberry flavor, I would try replacing some of the flour with freeze dried strawberry powder.
Otherwise, I’ve served the strawberry puree over the regular castella and it’s delicious!
Hope this helps, enjoy the recipe!
Yuto